1 OpenCV 环境的准备
这个项目中需要用到 opencv 进行图片的读取与处理操作,因此我们需要先配置一下 opencv 在 java 中运行的配置。
首先前往 opencv 官网下载 opencv-4.6 :点此下载;下载好后仅选择路径后即可完成安装。
此时将 opencv\build\java\x64 路径下的 opencv_java460.dll 复制到 C:\Windows\System32 中,再将 D:\Tools\opencv\opencv\build\java 下的 opencv-460.jar 放到我们 Springboot 项目 resources 文件夹下的 lib 文件夹下。
本文所需 ONNX 文件请 点此下载 。
YOLOV7 目标检测与姿态识别项目 Github 地址在 这里 。
2 Maven 配置
引入 onnxruntime 和 opencv 这两个依赖即可。值得注意的是,引 opencv 时systemPath记得与上文说的opencv-460.jar所在路径保持一致。
<dependency>
    <groupId>com.microsoft.onnxruntime</groupId>
    <artifactId>onnxruntime</artifactId>
    <version>1.12.1</version>
</dependency>

<dependency>
    <groupId>org.opencv</groupId>
    <artifactId>opencv</artifactId>
    <version>4.6.0</version>
    <scope>system</scope>
    <systemPath>${project.basedir}/src/main/resources/lib/opencv-460.jar</systemPath>
</dependency>
3 Utils
3.1 Letterbox.java
这个类负责调整图像大小和填充图像,使满足步长约束,并记录参数。
package cn.halashuo.yolov7.utils;

import org.opencv.core.Core;
import org.opencv.core.Mat;
import org.opencv.core.Size;
import org.opencv.imgproc.Imgproc;

public class Letterbox {

    private final Size newShape = new Size(1280, 1280);
    private final double[] color = new double[]{114,114,114};
    private final Boolean auto = false;
    private final Boolean scaleUp = true;
    private final Integer stride = 32;

    private double ratio;
    private double dw;
    private double dh;

    public double getRatio() {
        return ratio;
    }

    public double getDw() {
        return dw;
    }

    public Integer getWidth() {
        return (int) this.newShape.width;
    }

    public Integer getHeight() {
        return (int) this.newShape.height;
    }

    public double getDh() {
        return dh;
    }

    public Mat letterbox(Mat im) { // 调整图像大小和填充图像,使满足步长约束,并记录参数

        int[] shape = {im.rows(), im.cols()}; // 当前形状 [height, width]
        // Scale ratio (new / old)
        double r = Math.min(this.newShape.height / shape[0], this.newShape.width / shape[1]);
        if (!this.scaleUp) { // 仅缩小,不扩大(一起为了mAP)
            r = Math.min(r, 1.0);
        }
        // Compute padding
        Size newUnpad = new Size(Math.round(shape[1] * r), Math.round(shape[0] * r));
        double dw = this.newShape.width - newUnpad.width, dh = this.newShape.height - newUnpad.height; // wh 填充
        if (this.auto) { // 最小矩形
            dw = dw % this.stride;
            dh = dh % this.stride;
        }
        dw /= 2; // 填充的时候两边都填充一半,使图像居于中心
        dh /= 2;
        if (shape[1] != newUnpad.width || shape[0] != newUnpad.height) { // resize
            Imgproc.resize(im, im, newUnpad, 0, 0, Imgproc.INTER_LINEAR);
        }
        int top = (int) Math.round(dh - 0.1), bottom = (int) Math.round(dh + 0.1);
        int left = (int) Math.round(dw - 0.1), right = (int) Math.round(dw + 0.1);
        // 将图像填充为正方形
        Core.copyMakeBorder(im, im, top, bottom, left, right, Core.BORDER_CONSTANT, new org.opencv.core.Scalar(this.color));
        this.ratio = r;
        this.dh = dh;
        this.dw = dw;
        return im;
    }
}
3.2 Lable.java
这个类负责记录标签的名称,因为模型输出出来的类是一个坐标,每个坐标对应类名都在这里。同时为了方便管理,每个类画方框时所用颜色也在此随机生成。
package cn.halashuo.yolov7.utils;

import java.util.Random;
import java.util.ArrayList;
import java.util.Arrays;
import java.util.List;
import java.util.Map;
import java.util.HashMap;

public class Lable {
    private List<String> names = new ArrayList<>(Arrays.asList(
            "person", "bicycle", "car", "motorcycle", "airplane", "bus", "train",
            "truck", "boat", "traffic light", "fire hydrant", "stop sign", "parking meter",
            "bench", "bird", "cat", "dog", "horse", "sheep", "cow", "elephant", "bear",
            "zebra", "giraffe", "backpack", "umbrella", "handbag", "tie", "suitcase",
            "frisbee", "skis", "snowboard", "sports ball", "kite", "baseball bat",
            "baseball glove", "skateboard", "surfboard", "tennis racket", "bottle",
            "wine glass", "cup", "fork", "knife", "spoon", "bowl", "banana", "apple",
            "sandwich", "orange", "broccoli", "carrot", "hot dog", "pizza", "donut",
            "cake", "chair", "couch", "potted plant", "bed", "dining table", "toilet",
            "tv", "laptop", "mouse", "remote", "keyboard", "cell phone", "microwave",
            "oven", "toaster", "sink", "refrigerator", "book", "clock", "vase", "scissors",
            "teddy bear", "hair drier", "toothbrush"));

    private Map<String, double[]> colors;

    public Lable() {
        this.colors = new HashMap<>();
        names.forEach(name->{
            Random random = new Random();
            double[] color = {random.nextDouble()*256, random.nextDouble()*256, random.nextDouble()*256};
            colors.put(name, color);
        });
    }

    public String getName(int clsId) {
        return names.get(clsId);
    }

    public double[] getColor(int clsId) {
        return colors.get(getName(clsId));
    }
}
3.3 ModelResult.java
模型物体识别结果的实体类。
package cn.halashuo.yolov7.utils;

import java.text.DecimalFormat;

public class ModelResult {
    private final Integer batchId;
    private final Float x0;
    private final Float y0;
    private final Float x1;
    private final Float y1;
    private final Integer clsId;
    private final Float score;

    public ModelResult(float[] x) {
        this.batchId = (int) x[0];
        this.x0 = x[1];
        this.y0 = x[2];
        this.x1 = x[3];
        this.y1 = x[4];
        this.clsId = (int) x[5];
        this.score = x[6];
    }

    public Integer getBatchId() {
        return batchId;
    }

    public Float getX0() {
        return x0;
    }

    public Float getY0() {
        return y0;
    }

    public Float getX1() {
        return x1;
    }

    public Float getY1() {
        return y1;
    }

    public Integer getClsId() {
        return clsId;
    }

    public String getScore() {
        DecimalFormat df = new DecimalFormat("0.00%");
        return df.format(this.score);
    }

    @Override
    public String toString() {
        return "物体: " +
                " \t batchId=" + batchId +
                " \t x0=" + x0 +
                " \t y0=" + y0 +
                " \t x1=" + x1 +
                " \t y1=" + y1 +
                " \t clsId=" + clsId +
                " \t score=" + getScore() +
                " \t ;";
    }
}
4 YoloV7.java
设置好 ONNX 文件路径及需要识别的图片路径即可。如有需要也可设置 CUDA 作为运行环境,大幅提升 FPS。
package cn.halashuo.yolov7;

import ai.onnxruntime.OnnxTensor;
import ai.onnxruntime.OrtEnvironment;
import ai.onnxruntime.OrtException;
import ai.onnxruntime.OrtSession;
import cn.halashuo.yolov7.utils.Lable;
import cn.halashuo.yolov7.utils.Letterbox;
import cn.halashuo.yolov7.utils.ModelResult;
import org.opencv.core.*;
import org.opencv.highgui.HighGui;
import org.opencv.imgcodecs.Imgcodecs;
import org.opencv.imgproc.Imgproc;


import java.nio.FloatBuffer;
import java.util.Arrays;
import java.util.HashMap;

public class YOLO {

    static
    {
        //在使用OpenCV前必须加载Core.NATIVE_LIBRARY_NAME类,否则会报错
        System.loadLibrary(Core.NATIVE_LIBRARY_NAME);
    }

    public static void main(String[] args) throws OrtException {

        // 加载ONNX模型
        OrtEnvironment environment = OrtEnvironment.getEnvironment();
        OrtSession.SessionOptions sessionOptions = new OrtSession.SessionOptions();
        OrtSession session = environment.createSession("other\\yolov7-d6.onnx", sessionOptions);

        // 输出基本信息
        session.getInputInfo().keySet().forEach(x-> {
            try {
                System.out.println("input name = " + x);
                System.out.println(session.getInputInfo().get(x).getInfo().toString());
            } catch (OrtException e) {
                throw new RuntimeException(e);
            }
        });

        // 加载标签及颜色
        Lable lable = new Lable();

        // 读取 image
        Mat img = Imgcodecs.imread("other/test.jpg");
        Imgproc.cvtColor(img, img, Imgproc.COLOR_BGR2RGB);
        Mat image = img.clone();

        // 在这里先定义下框的粗细、字的大小、字的类型、字的颜色(按比例设置大小粗细比较好一些)
        int minDwDh = Math.min(img.width(), img.height());
        int thickness = minDwDh/333;
        double fontSize = minDwDh/1145.14;
        int fontFace = Imgproc.FONT_HERSHEY_SIMPLEX;
        Scalar fontColor = new Scalar(255, 255, 255);

        // 更改 image 尺寸
        Letterbox letterbox = new Letterbox();
        image = letterbox.letterbox(image);

        double ratio  = letterbox.getRatio();
        double dw = letterbox.getDw();
        double dh = letterbox.getDh();
        int rows  = letterbox.getHeight();
        int cols  = letterbox.getWidth();
        int channels = image.channels();


        // 将Mat对象的像素值赋值给Float[]对象
        float[] pixels = new float[channels * rows * cols];
        for (int i = 0; i < rows; i++) {
            for (int j = 0; j < cols; j++) {
                double[] pixel = image.get(j,i);
                for (int k = 0; k < channels; k++) {
                    // 这样设置相当于同时做了image.transpose((2, 0, 1))操作
                    pixels[rows*cols*k+j*cols+i] = (float) pixel[k]/255.0f;
                }
            }
        }

        // 创建OnnxTensor对象
        long[] shape = { 1L, (long)channels, (long)rows, (long)cols };
        OnnxTensor tensor = OnnxTensor.createTensor(environment, FloatBuffer.wrap(pixels), shape);
        HashMap<String, OnnxTensor> stringOnnxTensorHashMap = new HashMap<>();
        stringOnnxTensorHashMap.put(session.getInputInfo().keySet().iterator().next(), tensor);

        // 运行模型
        OrtSession.Result output = session.run(stringOnnxTensorHashMap);

        // 得到结果
        float[][] outputData = (float[][]) output.get(0).getValue();
        Arrays.stream(outputData).iterator().forEachRemaining(x->{
            ModelResult modelResult = new ModelResult(x);
            System.out.println(modelResult);

            // 画框
            Point topLeft = new Point((modelResult.getX0()-dw)/ratio, (modelResult.getY0()-dh)/ratio);
            Point bottomRight = new Point((modelResult.getX1()-dw)/ratio, (modelResult.getY1()-dh)/ratio);
            Scalar color = new Scalar(lable.getColor(modelResult.getClsId()));
            Imgproc.rectangle(img, topLeft, bottomRight, color, thickness);

            // 框上写文字
            String boxName = lable.getName(modelResult.getClsId()) + ": " + modelResult.getScore();
            Point boxNameLoc = new Point((modelResult.getX0()-dw)/ratio, (modelResult.getY0()-dh)/ratio-3);
            Imgproc.putText(img, boxName, boxNameLoc, fontFace, fontSize, fontColor, thickness);

        });
        Imgproc.cvtColor(img, img, Imgproc.COLOR_RGB2BGR);
        // 保存图像
        // Imgcodecs.imwrite("C:\\Users\\pbh0612\\Desktop\\image.jpg", img);
        HighGui.imshow("Display Image", img);
        // 等待按下任意键继续执行程序
        HighGui.waitKey();
    }
}
运行结果:
input name = images
TensorInfo(javaType=FLOAT,onnxType=ONNX_TENSOR_ELEMENT_DATA_TYPE_FLOAT,shape=[1, 3, 1280, 1280])
物体:      batchId=0   x0=373.3943     y0=659.8634     x1=553.5588     y1=1031.9065    clsId=0     score=95.59%    ;
物体:      batchId=0   x0=552.2209     y0=499.82382    x1=741.4096     y1=1041.5698    clsId=0     score=95.21%    ;
物体:      batchId=0   x0=814.59875    y0=606.4736     x1=1041.6691    y1=1027.655     clsId=0     score=95.14%    ;
物体:      batchId=0   x0=544.29016    y0=417.2976     x1=612.7943     y1=459.89227    clsId=29    score=92.77%    ;
物体:      batchId=0   x0=0.20257473   y0=862.7974     x1=18.631138    y1=1012.6624    clsId=0     score=37.05%    ;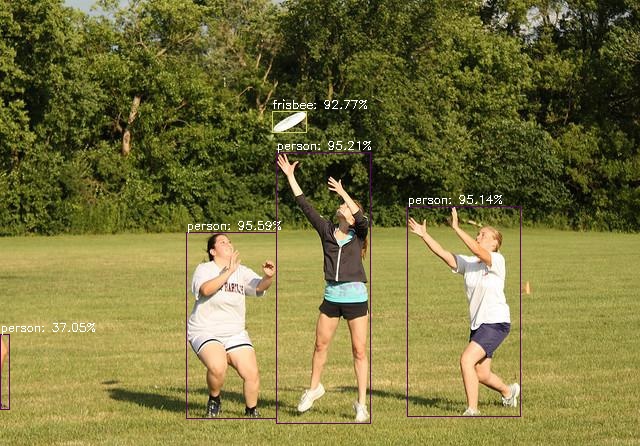
使用 YOLOV7 的官方模型训练并转化成 onnx 后,得到的是已经经过 NMS 后的检测结果。故输出维度为 $n\times 7$,其中 $n$ 表示最终检测到多少个物体,每一个物体的检测结果包括
batchId:第几张图片(例子中我们只上传了一张图片,因此batchId只有 0)、x0:左上角x坐标 、y0:左上角y坐标、x1:右下角x坐标、y1:右下角y坐标、clsId:所属份类、score置信度。
5 Python 代码
也可以使用 Python 的 onnxruntime 直接进行预测,代码如下:
import cv2
import random
import onnxruntime
import numpy as np
from PIL import Image

def letterbox(im, new_shape=(1280, 1280), color=(114, 114, 114), auto=True, scaleup=True, stride=32):
    # Resize and pad image while meeting stride-multiple constraints
    shape = im.shape[:2]  # current shape [height, width]
    if isinstance(new_shape, int):
        new_shape = (new_shape, new_shape)

    # Scale ratio (new / old)
    r = min(new_shape[0] / shape[0], new_shape[1] / shape[1])
    if not scaleup:  # only scale down, do not scale up (for better val mAP)
        r = min(r, 1.0)

    # Compute padding
    new_unpad = int(round(shape[1] * r)), int(round(shape[0] * r))
    dw, dh = new_shape[1] - new_unpad[0], new_shape[0] - new_unpad[1]  # wh padding

    if auto:  # minimum rectangle
        dw, dh = np.mod(dw, stride), np.mod(dh, stride)  # wh padding

    dw /= 2  # divide padding into 2 sides
    dh /= 2

    if shape[::-1] != new_unpad:  # resize
        im = cv2.resize(im, new_unpad, interpolation=cv2.INTER_LINEAR)
    top, bottom = int(round(dh - 0.1)), int(round(dh + 0.1))
    left, right = int(round(dw - 0.1)), int(round(dw + 0.1))
    im = cv2.copyMakeBorder(im, top, bottom, left, right, cv2.BORDER_CONSTANT, value=color)  # add border
    return im, r, (dw, dh)

names = ['person', 'bicycle', 'car', 'motorcycle', 'airplane', 'bus', 'train', 'truck', 'boat', 'traffic light',
         'fire hydrant', 'stop sign', 'parking meter', 'bench', 'bird', 'cat', 'dog', 'horse', 'sheep', 'cow',
         'elephant', 'bear', 'zebra', 'giraffe', 'backpack', 'umbrella', 'handbag', 'tie', 'suitcase', 'frisbee',
         'skis', 'snowboard', 'sports ball', 'kite', 'baseball bat', 'baseball glove', 'skateboard', 'surfboard',
         'tennis racket', 'bottle', 'wine glass', 'cup', 'fork', 'knife', 'spoon', 'bowl', 'banana', 'apple',
         'sandwich', 'orange', 'broccoli', 'carrot', 'hot dog', 'pizza', 'donut', 'cake', 'chair', 'couch',
         'potted plant', 'bed', 'dining table', 'toilet', 'tv', 'laptop', 'mouse', 'remote', 'keyboard', 'cell phone',
         'microwave', 'oven', 'toaster', 'sink', 'refrigerator', 'book', 'clock', 'vase', 'scissors', 'teddy bear',
         'hair drier', 'toothbrush']

colors = {name:[random.randint(0, 255) for _ in range(3)] for i,name in enumerate(names)}

# 读取onnx模型
cuda = False
providers = ['CUDAExecutionProvider', 'CPUExecutionProvider'] if cuda else ['CPUExecutionProvider']
session = onnxruntime.InferenceSession('yolov7-d6.onnx', providers=providers)
# 获取输入节点名称和形状
input_name = session.get_inputs()[0].name
input_shape = session.get_inputs()[0].shape
print(f"节点名称为 {input_name},形状为 {input_shape}")

img = cv2.imread('test.jpg')
img = cv2.cvtColor(img, cv2.COLOR_BGR2RGB)

image = img.copy()
image, ratio, dwdh = letterbox(image, auto=False)
image = image.transpose((2, 0, 1))
image = np.expand_dims(image, 0)
image = np.ascontiguousarray(image)

im = image.astype(np.float32)
im /= 255

outname = [i.name for i in session.get_outputs()]
inname = [i.name for i in session.get_inputs()]
inp = {inname[0]:im}

outputs = session.run(outname, inp)[0]

ori_images = [img.copy()]

for i, (batch_id, x0, y0, x1, y1, cls_id, score) in enumerate(outputs):
    image = ori_images[int(batch_id)]
    box = np.array([x0,y0,x1,y1])
    box -= np.array(dwdh*2)
    box /= ratio
    box = box.round().astype(np.int32).tolist()
    cls_id = int(cls_id)
    score = round(float(score),3)
    name = names[cls_id]
    color = colors[name]
    name += ' '+str(score)
    cv2.rectangle(image,box[:2],box[2:],color,2)
    cv2.putText(image,name,(box[0], box[1] - 2),cv2.FONT_HERSHEY_SIMPLEX,0.75,[225, 255, 255],thickness=2)

Image.fromarray(ori_images[0])
1 条评论
牛的,实现了。|´・ω・)ノ